Christmas Cookie Snowflakes and Stars
When I made my popular fall leaf cookies last month, I was already thinking ahead. I had just learned how to do a fun icing technique called “cookie flooding” and I wondered… How could I adapt this for Christmas cookie snowflakes and stars?

Christmas cookie snowflakes and stars
This year, daughter #3 is appearing in a community theater production of the Christmas classic, Miracle on 34th Street. So why not send cookies to one of the many (many) shows– since everyone involved is truly a star.

Christmas Cookie Snowflakes and Stars Drying
This time I used a different recipe for royal icing, made with meringue powder and adapted from Wilton. The original used corn syrup but I was out of my organic and I just couldn’t bring myself to head to the grocers for conventional, knowing it would be GMO. But this recipe worked great–so I may have a new favorite.
The technique is very much like the fall cookies and much easier than you’d think. It goes like this:
You start by making sugar cookies, letting them cool, then piping a butter cream outline using a #3 or 4 tip. If the icing is taking too much energy to pipe out, pop the bag in the microwave for a few seconds to warm and soften it. After a while the heat from your hands will work to soften it too. The butter cream acts as a bit of a dam for the softer royal icing that will go in the center.
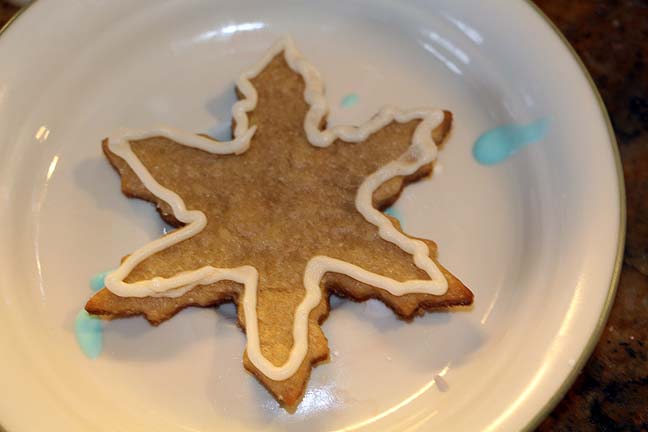
Outline cookie in butter cream icing
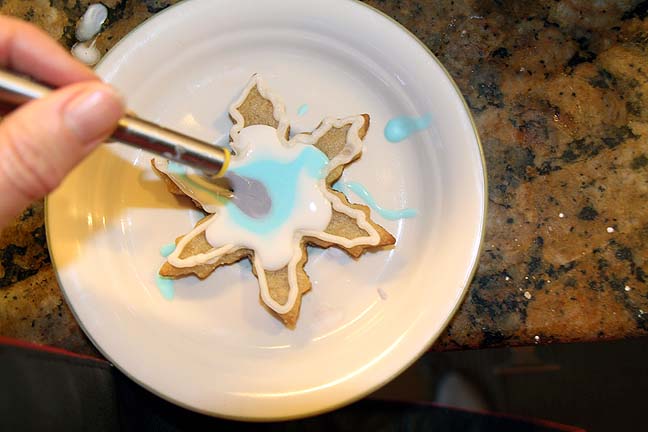
Using the white royal icing, make a large circle in the center of the cookie. Place a smaller blue icing circle in the center of that and a large dot of purple in the very center.

Drizzle concentric circles of icing in the middle of the cookie
Using a blunt tool (I used the handle end of a fondue fork), spread the icing. Starting in the center, drag a line of icing out to the first point. Return to the center then go to the second point and so on until done.
Drag colors into points of the snowflake cookie
 For the stars I got more abstract and made less symmetrical lines and an occasional swirl.
Let the cookies dry, ideally overnight. As you can see below, if you move a cookie before it is fully dry, the frosting may run underneath, cracking the top and creating ripples. So try not to move them too much.
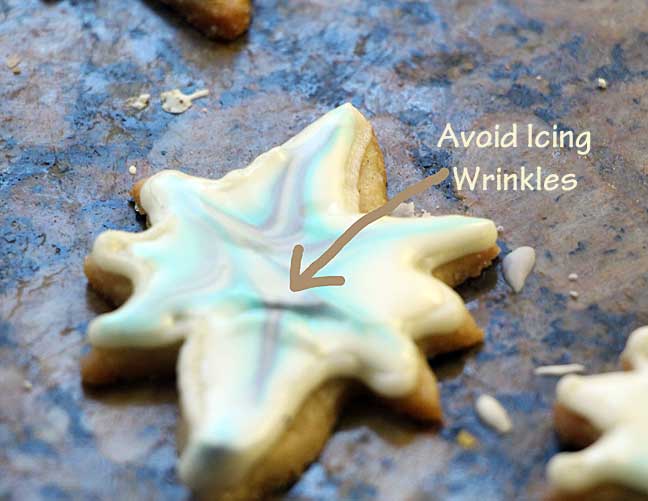
Star Cookie with wrinkled icing
Most of the cookies went out for snacking during one of the shows and my daughter sent back thanks. I was happy to donate–they deserve it after spreading all that Christmas cheer!

Christmas Cookie Snowflakes and Stars

Ingredients
Cookies
- 1 cup (2 sticks) unsalted butter, softened
- 1 1/2 cups granulated sugar
- 1 egg
- 2 teaspoons pure vanilla extract
- 2 3/4 cups all-purpose flour
- 1/2 teaspoon salt
Buttercream frosting
- 1/2 cup butter softened
- 2 cup powdered sugar
- 1 teaspoon water
- 1/2 teaspoon vanilla
Royal icing
- 3 tablespoons Meringue Powder
- 4 cups (about 1 lb.) confectioners' sugar
- 6 tablespoons warm water or more as needed
- 1/2 teaspoon vanilla extract
- food coloring I used Wilton sky blue & no-taste red
Instructions
For cookies
- Preheat oven to 400°F.
- In mixing bowl, cream butter with sugar until light and fluffy. Beat in egg and vanilla. Mix flour and salt; add to butter mixture 1 cup at a time, mixing after each addition.
- Divide dough into 2 balls. On a floured surface, roll each ball into a circle approximately 12 in. wide and 1/8 in. thick. Dip cookie cutter in flour before each use.
- Bake cookies on ungreased cookie sheet 6-7 minutes or until cookies are lightly browned. Let cool before frosting
For buttercream
- Combine all ingredients in a small mixing bowl, adjusting water and powdered sugar as needed to achieve desired (thick) consistency. Mix until fluffy.
- Fill a piping bag fitted with a small circle tip (e.g. #3 or #4) with buttercream frosting, and set aside. Alternatively, cut a very small hole in the corner of a plastic bag and fill (note: I haven't tried this but people say it works).
- Using the buttercream frosting in the bag, pipe an outline around the border of the cookie. Allow to set up for about 10-15 minutes.
For the royal icing
- In a medium bowl, combine all ingredients and beat with electric mixer until smooth. Consistency should be that of a thick syrup, similar to molasses. Adjust water as needed.
- Put some of the royal icing into two smaller bowls. Mix in food coloring to make blue in one container and purple (red & blue colors) in the other.
- When ready to flood, use extra piping bags or a small spoon to drizzle different colors of royal icing onto each cookie starting with a large circle of white. Drizzle a smaller circle of blue in the center of the white and a still smaller circle of purple inside of that (see picture above).
- Use a narrow pointed object to drag icing to the edges, without allowing it to spill over.
- Swirl if desired.
- Allow to dry until firm, ideally overnight.
Simply beautiful! Love your creative style! I am sure your cookies were as much a hit as your daughter was! Merry Christmas to you and yours, Inger!
Thanks Kathy, it was fun to have (more) people to bake for! I hope (belatedly) that your holidays went well–I looked quickly at some great looking food over on your blog and will be back soon to check out in more detail.
These are beautiful! What a great backstage treat!
Thanks Lynn. Everyone in the cast and crew sure deserved a treat!
Pretty cookies, Inger! That was sweet of you to send them with your daughter to her cool gig!
Thanks Lisa. There seemed to be more and more food with each successive show! Adds to the festivity I presume!
hi inger! you must be busy doing your christmas baking and shopping! the cookies are pretty and festive looking especially with the additional colours icing that you made on them! your daughter must be so proud of you too!
Thanks Lena. Though truthfully she said, “oh I didn’t look at them, I just ate them.” So I’m glad that all of you got to see them!
Gorgeous, Inger!!! How delightful that your daughter is in Miracle on 34th Street. That movie is my very best favorite holiday movie. I’m your daughter will do fantabulous!
I love the way you have developed this technique and are so kind to share too. They really look so festive. I’m sure they taste yummy too! I’m sure they were a huge hit!!!
Thank you so much for sharing, Inger…
Thanks Louise. It was all so much fun, but I am glad that things are (slowly) returning to normal. I’ll be by to catch up on what I missed soon!
Such lovely icing, I love the colour from the sprinkles 😀
I would eat these in a heartbeat (sorry Santa!)
Cheers
Choc Chip Uru
This made enough for both you and Santa 😉
Gorgeous cookies – and congratulations to your daughter!
Thanks Beth–it’s been so much fun!
your icing designs are just lovely! these cookies are absolutely delightful. 🙂
Thanks Grace! I’ve wanted to do snowflakes for ages!