
Homemade Sponge Candy
Like an airy, crunchy toffee coated in chocolate, sponge candy is a holiday treat that you can make at home with just a few ingredients. 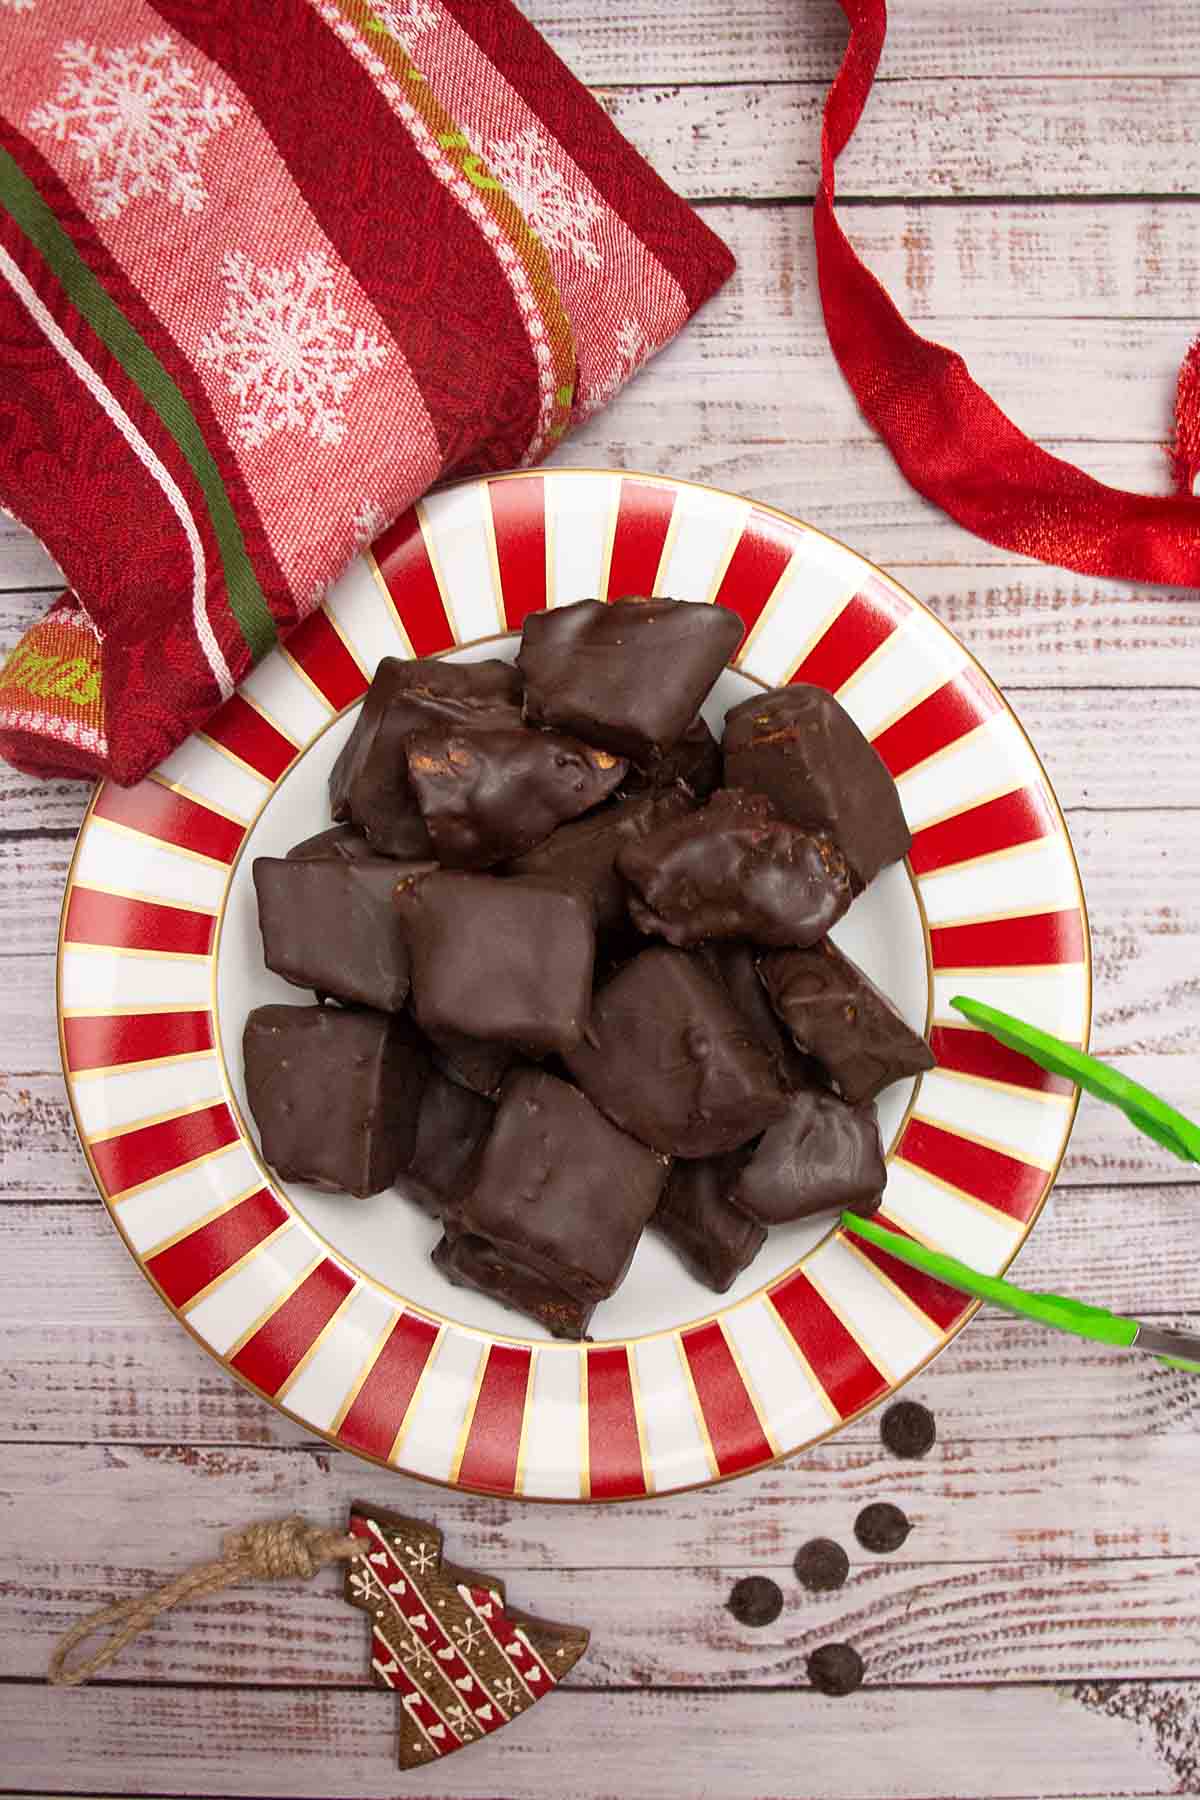
Perhaps this falls under the category of don’t tell me I can’t do something.
But the first time I made this recipe it failed. And while the recipe is classed as intermediate in difficultly, I’ve been making candy for decades. So I was slightly perturbed.
Come the new holiday season, I was determined to nail it. And after six (or was it seven) tests, I had it down–and learned a lot! And maybe gained a pound or two 🙂 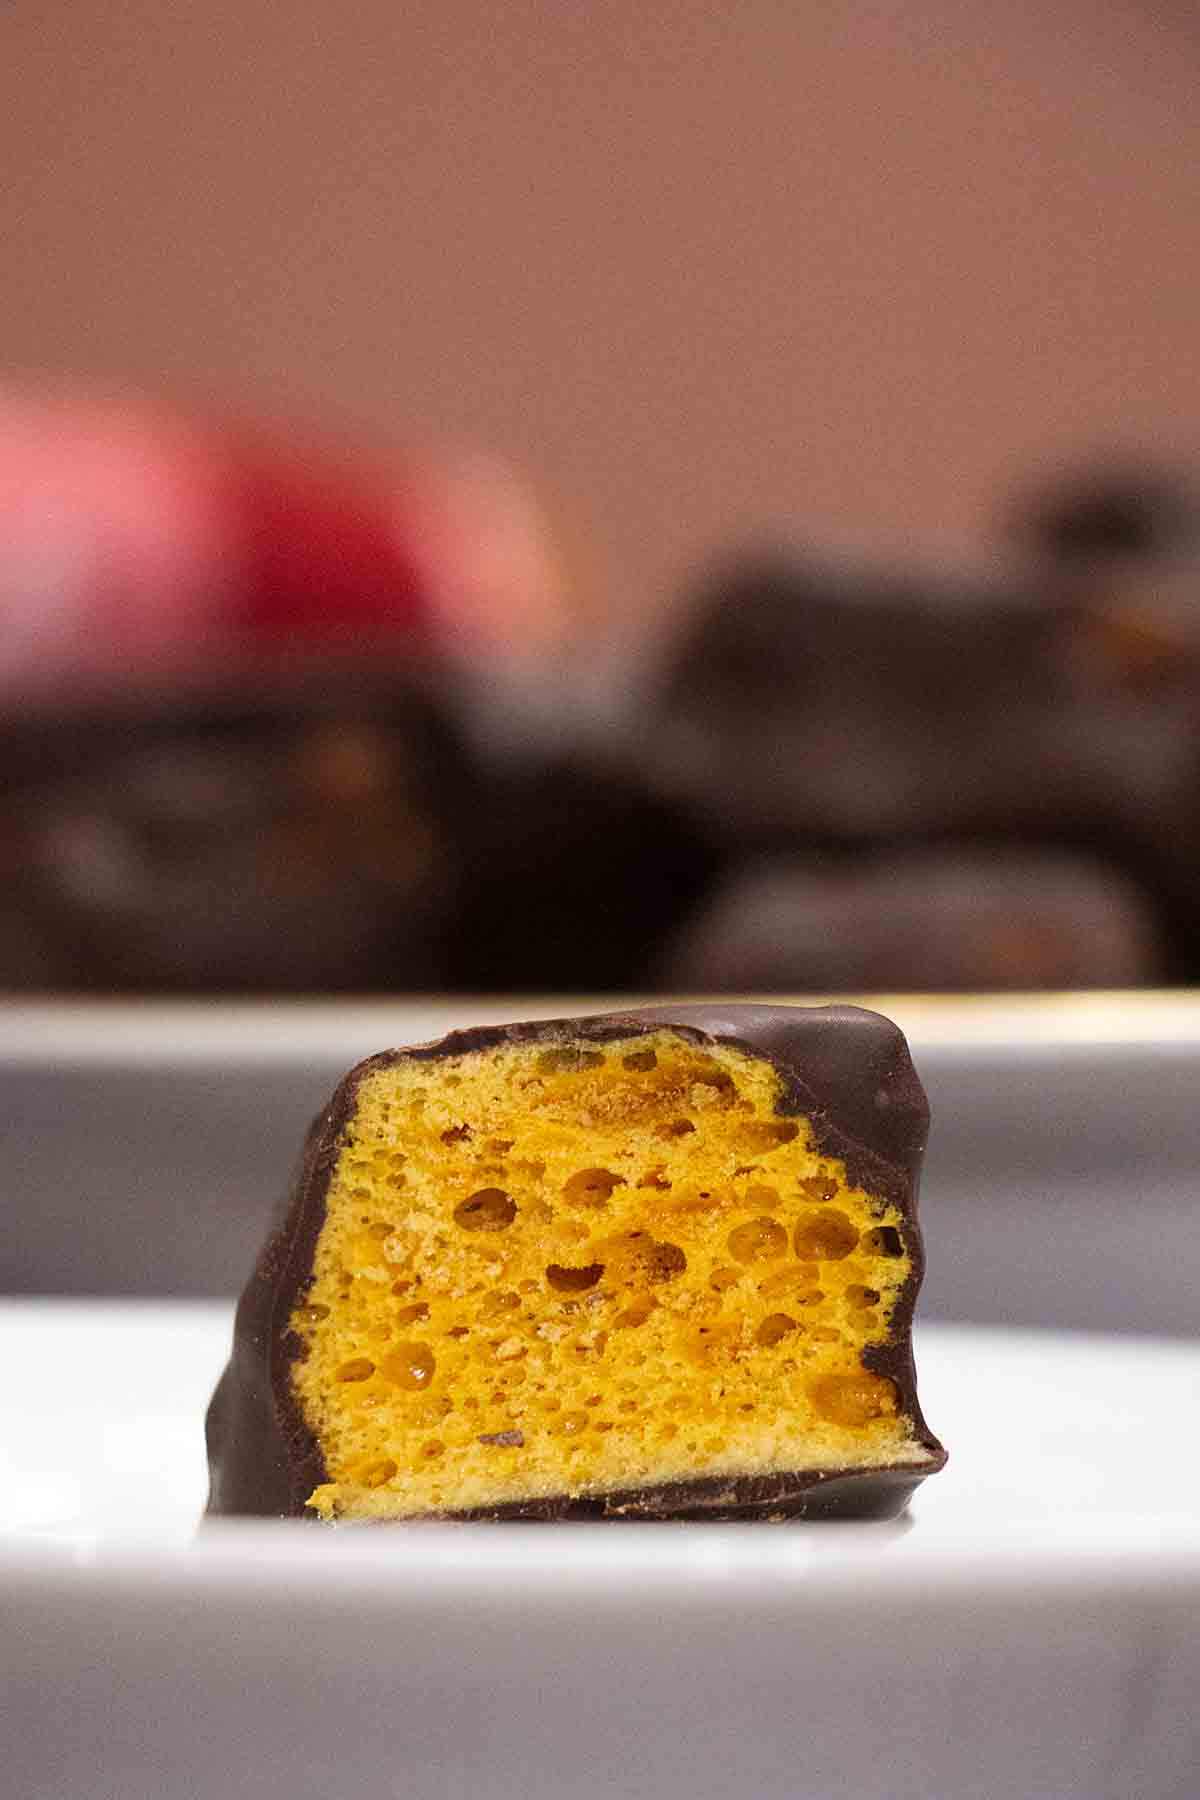
What is Sponge Candy?
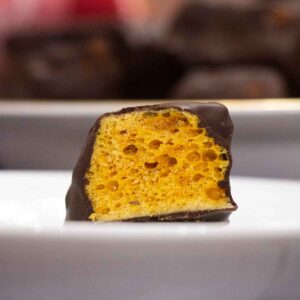
According to Fowler’s Chocolate “Sponge Candy is a light and crunchy but delicate toffee made from sugar, corn syrup, and baking soda. The recipe is very simple but produces a very unique flavor reminiscent of toasted molasses.”
Even better it is then (usually) coated in chocolate—yum!
There are many regional variations in the name. In Wisconsin, it goes by Fairy Food and sometimes Angel Food, while in Britain it’s cinder toffee. That is unless you get the commercial candy bar–then it’s a Cadbury Crunchie. Yes, I think I brought home half a suitcase of these when I studied in Ireland.
Now if you leave off the chocolate it is really the same as another tasty candy that goes by the name of honeycomb candy. In that form, it can also be eaten plan or crushed to use as a tasty topping.

What Makes This a Winner
This is a tasty holiday candy favorite that’s even better homemade. That gives you:
- Great flavor. Since I’ve always loved this candy, I was really surprised that homemade tasted even better.
- Quality and freshness. Sometime in the store I’d get sponge candy that’s a little too chewy and figured it wasn’t as fresh as it could be. Not a problem for homemade!
- Uses simple basic ingredients. Using just basic ingredients, this can be made in about as much working time as a trip to the store.
Now just as a caution, in a number of online reviews, people likened this candy to burnt marshmallows (though it’s possible they actually did burn it!). But for those who love it, Sponge Candy is a treat!
Step by Step Directions
Preheat the oven to 225 F if using the oven cool method (recommended).
Line a 9 x 13 baking pan with parchment paper (not wax paper, which isn’t heat tolerant). Crease the edges slightly to help it sit in the pan. You will be pouring the candy onto the parchment. Set the pan where it is convenient to the grab quickly. 
Combine the sugar and corn syrup in a large saucepan (the pan must is large to allow room for the syrup space to foam up). On medium heat, stir until the sugar is dissolved, then stop stirring but continue to cook. 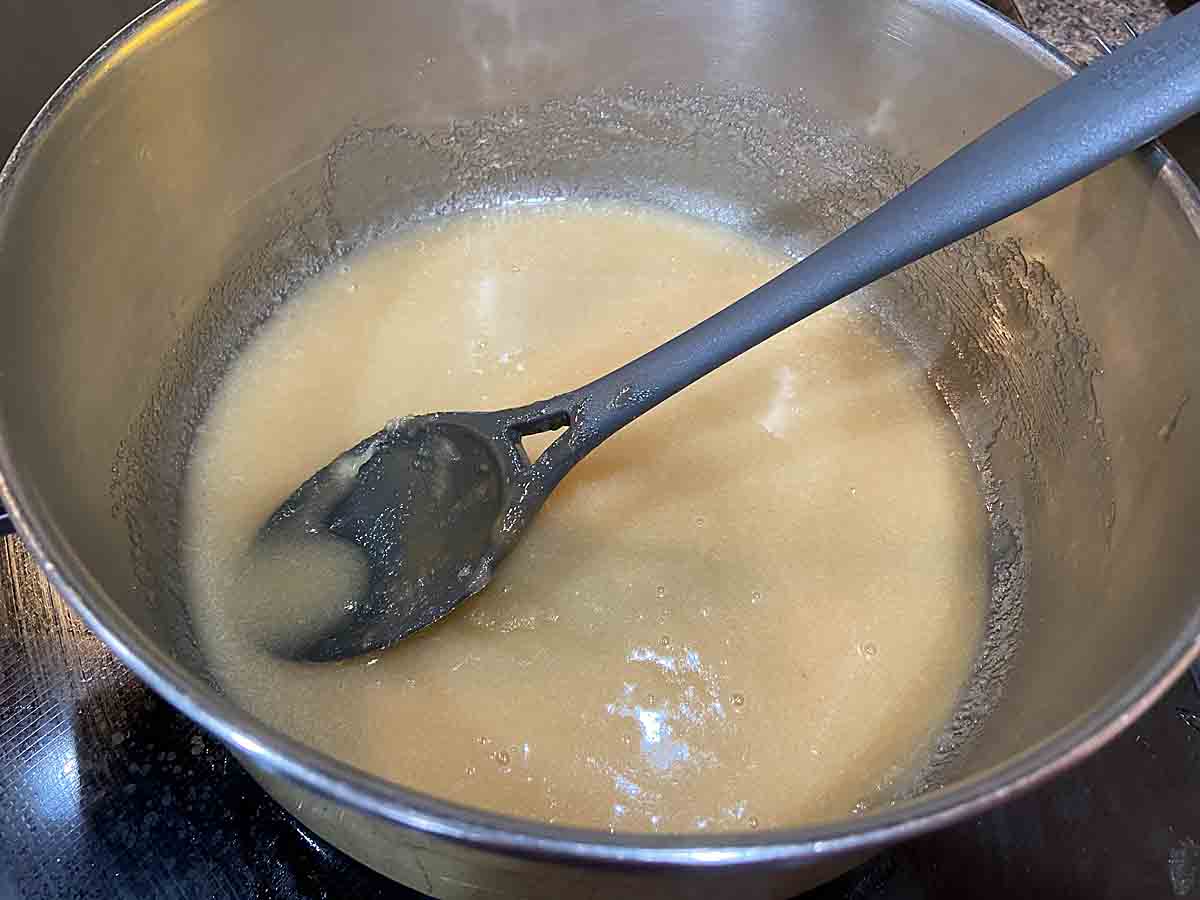
Sift the baking soda so no lumps remain and set near the stove. 
When the syrup cones to a boil, begin checking the temperature periodically with an instant read thermometer. After it has been boiling about 5-10 minutes it will start to turn just slightly yellow which means it is nearing the proper temperature of 295 F. If the syrup is heating very unevenly, swirl the syrup in the pan and lower the heat slightly. 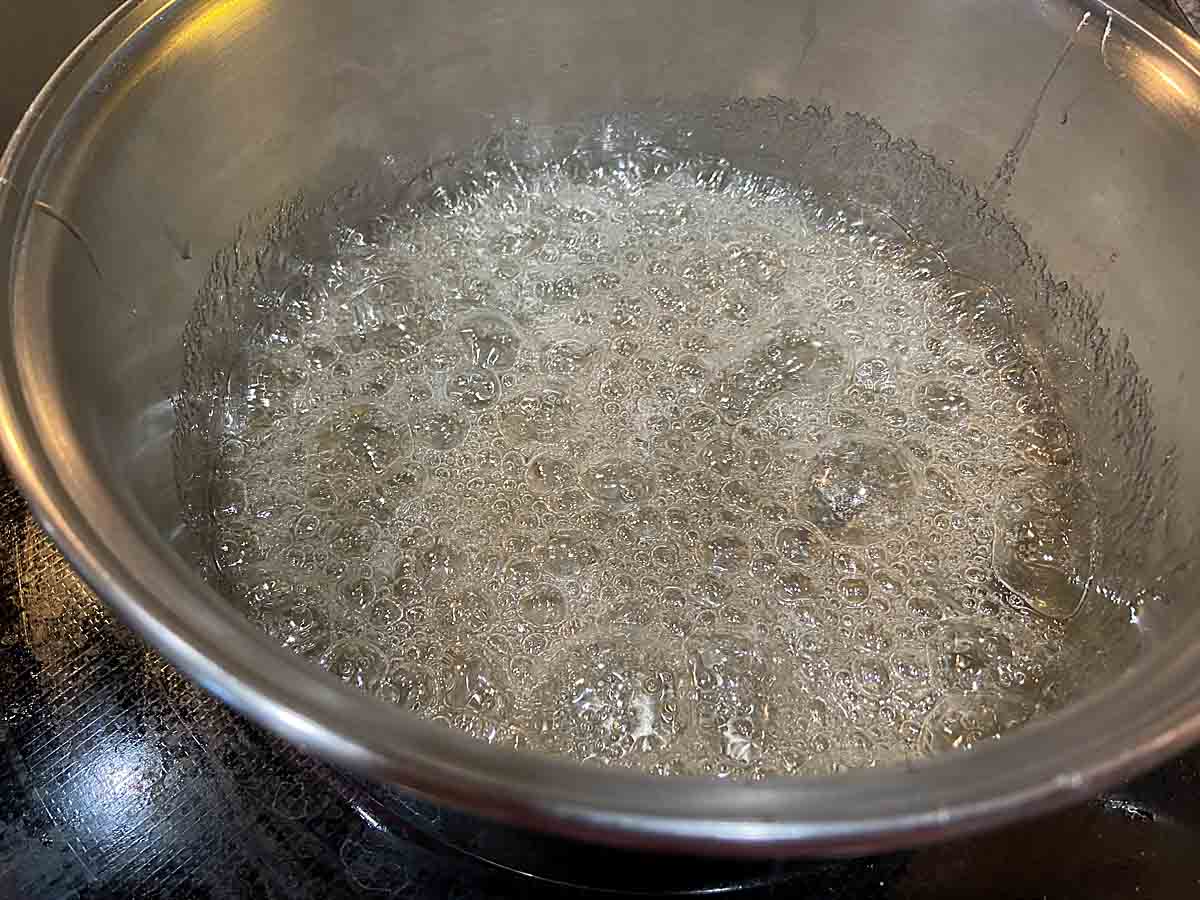
When the syrup reaches 295 F, stir in the sifted baking soda until just mixed. It may foam up or if already very bubbly, may sink. Immediately pour the mixture into the parchment lined pan disturbing it as little as possible. Don’t worry that it doesn’t fill the pan and don’t level it–you are trying to keep the bubbles intact. 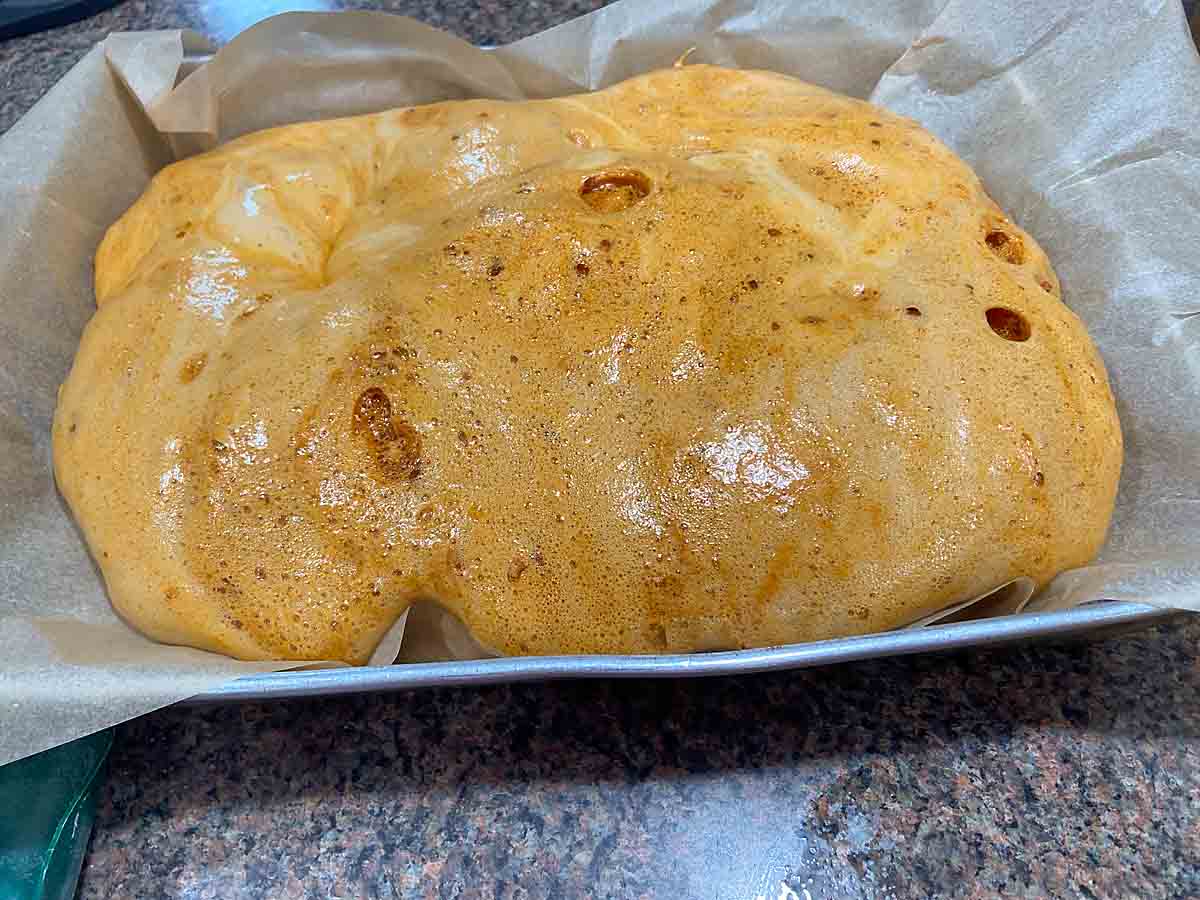
If cooling at room temperature, leave the pan completely undisturbed.
If using the oven cool method, put the pan in a 225 F oven then turn off the heat. Let sit for 15 minutes, then remove to finish cooling.
Preparing the Chocolate and Dipping
When the candy is completely cool and firm (up to a couple hours—I left mine overnight), prepare the chocolate. Chop the chocolate fine, them melt the cocoa butter (or coconut oil substitute) in the microwave. Heat in 30 second bursts, stirring between bursts until melted. 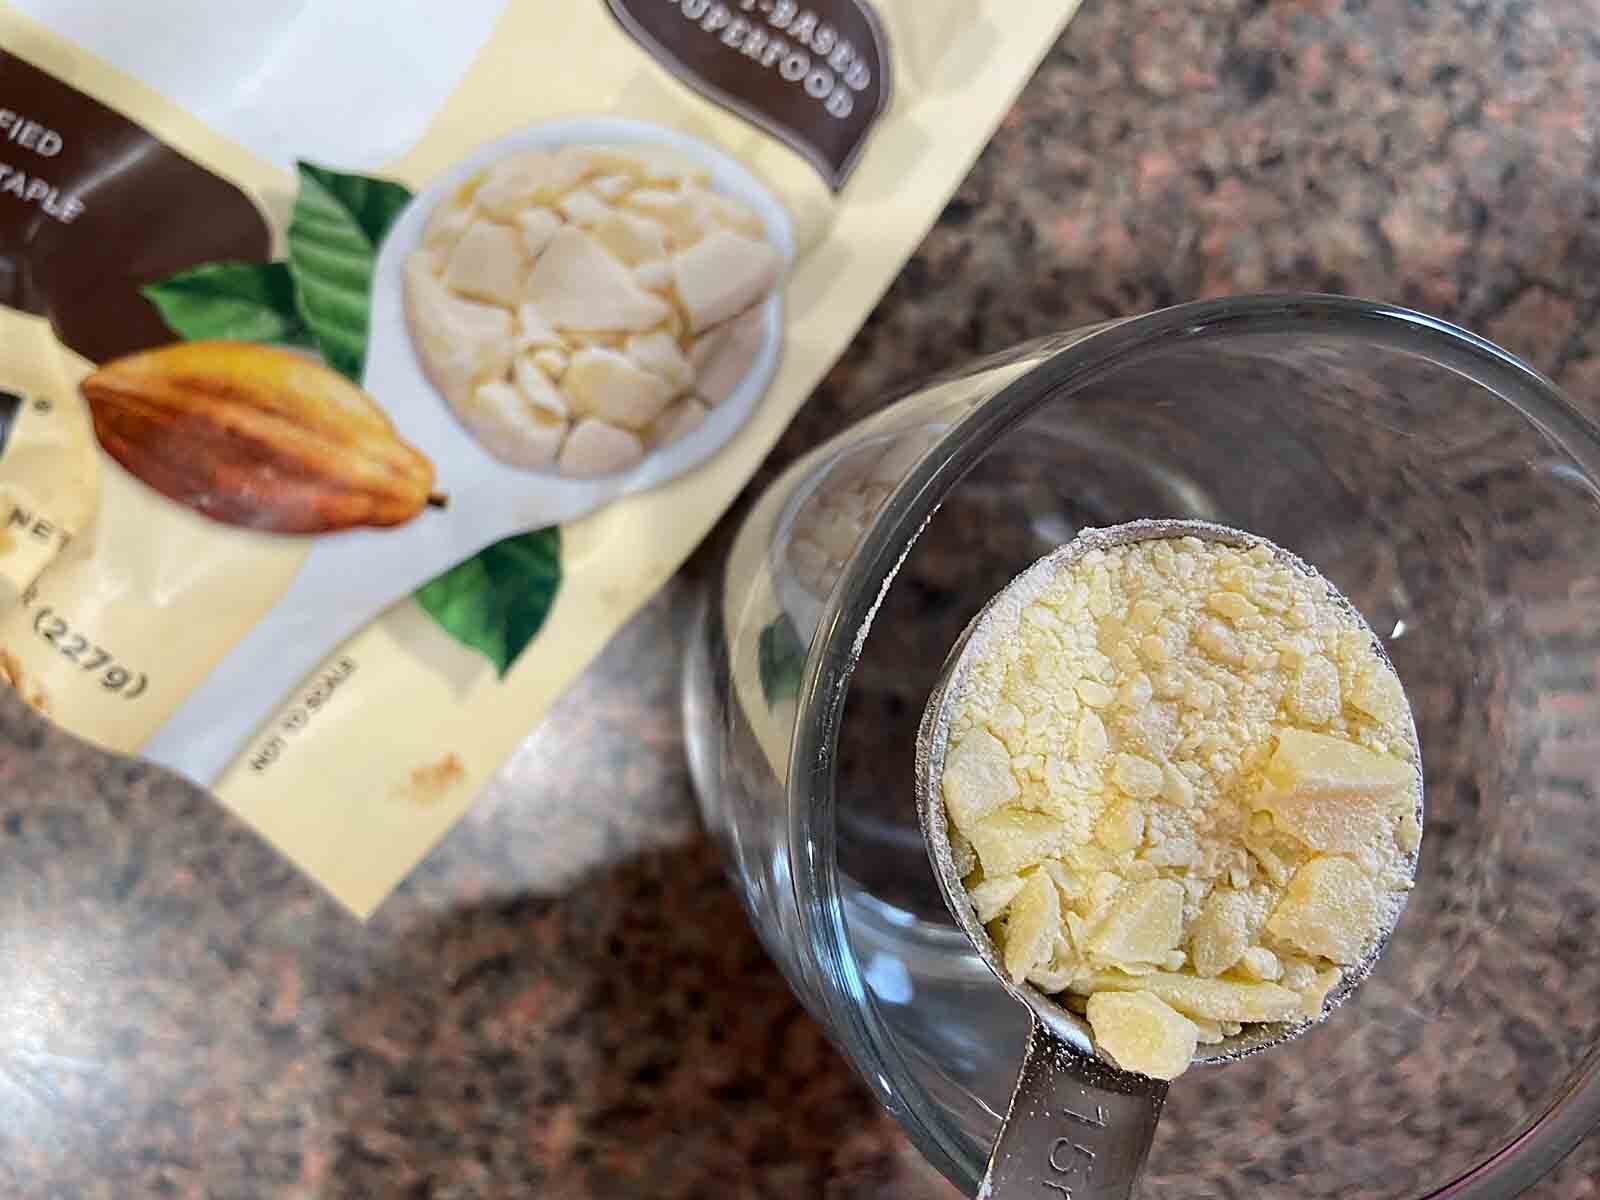
Add about ¼ cup chopped chocolate to the cocoa butter. Stir until partly melted, then heat again for 10 seconds. Using the instant read thermometer, take the temperature of the chocolate after every time in the microwave.
Your goal is to keep dark chocolate under 92 F or milk chocolate under 86 F. If the temperature is getting too close to the max, use shorter microwave bursts or stir for longer in between bursts. When chocolate is melted, add another ¼ cup and continue until it’s all melted.
If you succeed at this method of melting, you keep your chocolate in temper. This means it will be solid at room temperature with a nice snap. For more on tempering chocolate see the Sugar Geek.
The easiest way to break the candy is to score it with a knife, then break it by hand along the score lines. 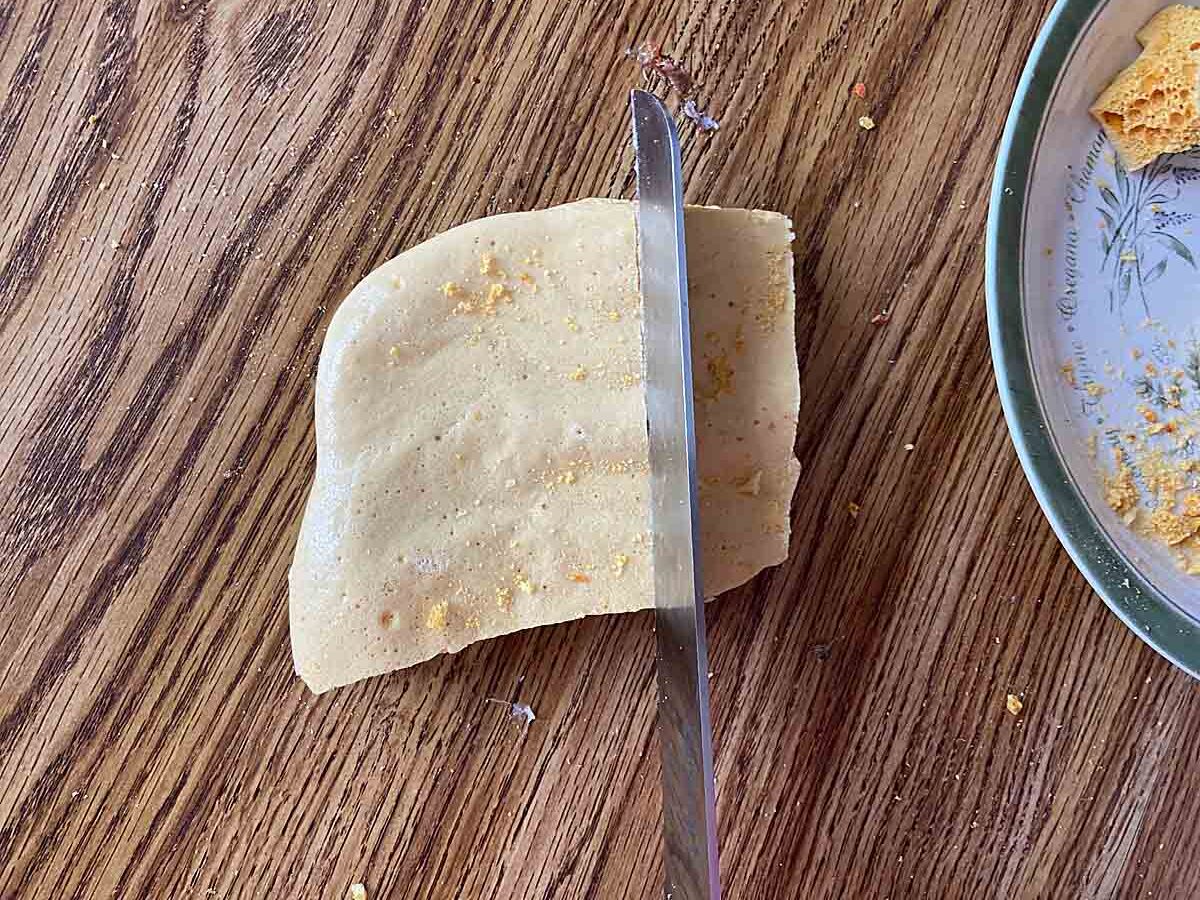
I dropped the candy into my melted chocolate one piece at a time, then rolled it and pulled it out with a fork. 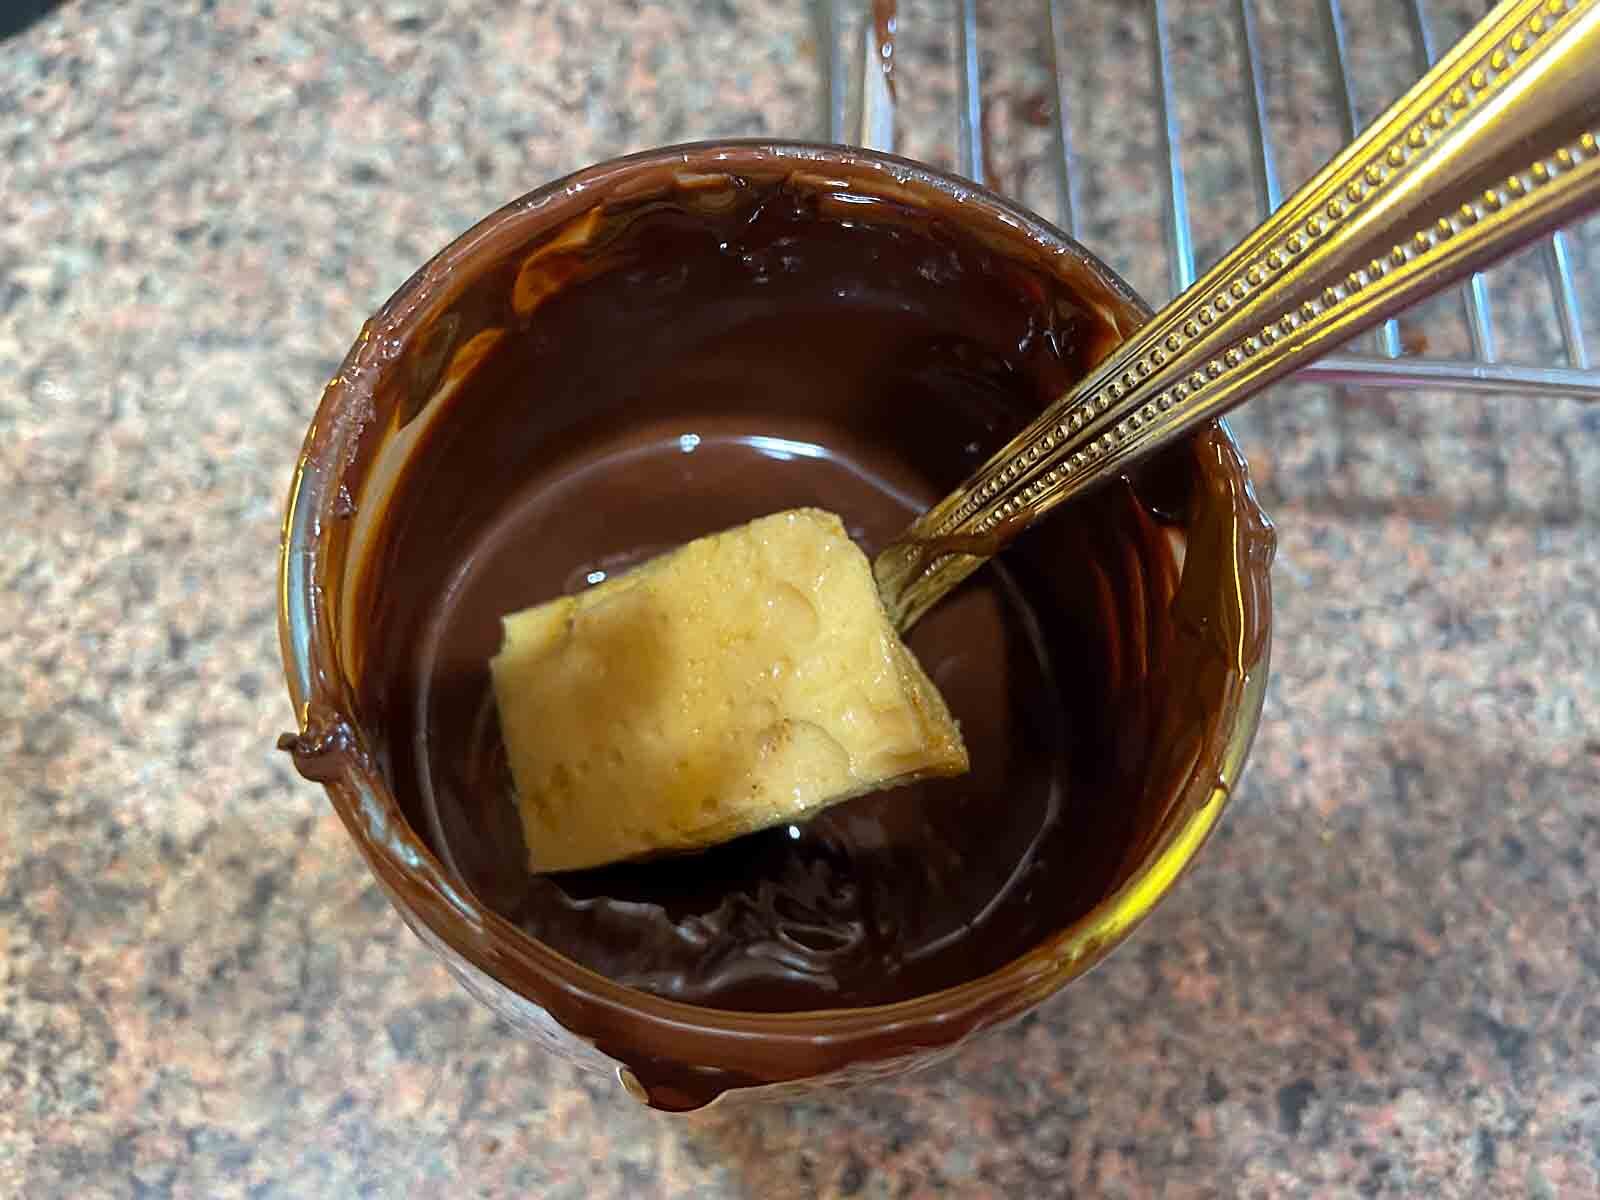
Then I set it to solidify on a cooling rack until hardened. When the dipping chocolate cooled too much, I’d microwave again for a few seconds and stir, then continue dipping. 
Different Ingredient Tests
While the ingredients and methods in the various online Sponge Candy recipes are pretty similar, there are some variations. After this candy failed on me the first time, I wanted at approach it very systematically this year!
I tested multiple versions of the recipe Many of the variations didn’t make a whole lot of difference, but getting to really understand a recipe is part of the fun of food blogging!
Light corn syrup versus dark. I found that both worked but ultimately I preferred the light. The dark had slightly more flavor, but it almost came off as slightly chemical to me. The deciding factor was that the dark hid the caramelization that was occurring as the syrup cooked making it more likely to slightly burn a batch. But I’d use dark if that was all I had around.
White sugar versus brown versus a mixture. While I liked the flavor of the brown sugar slightly more, the white was much easier to work with. Like the dark corn syrup, the brown sugar hid any caramelization color change. And once coated with chocolate, the flavor advantage disappeared.
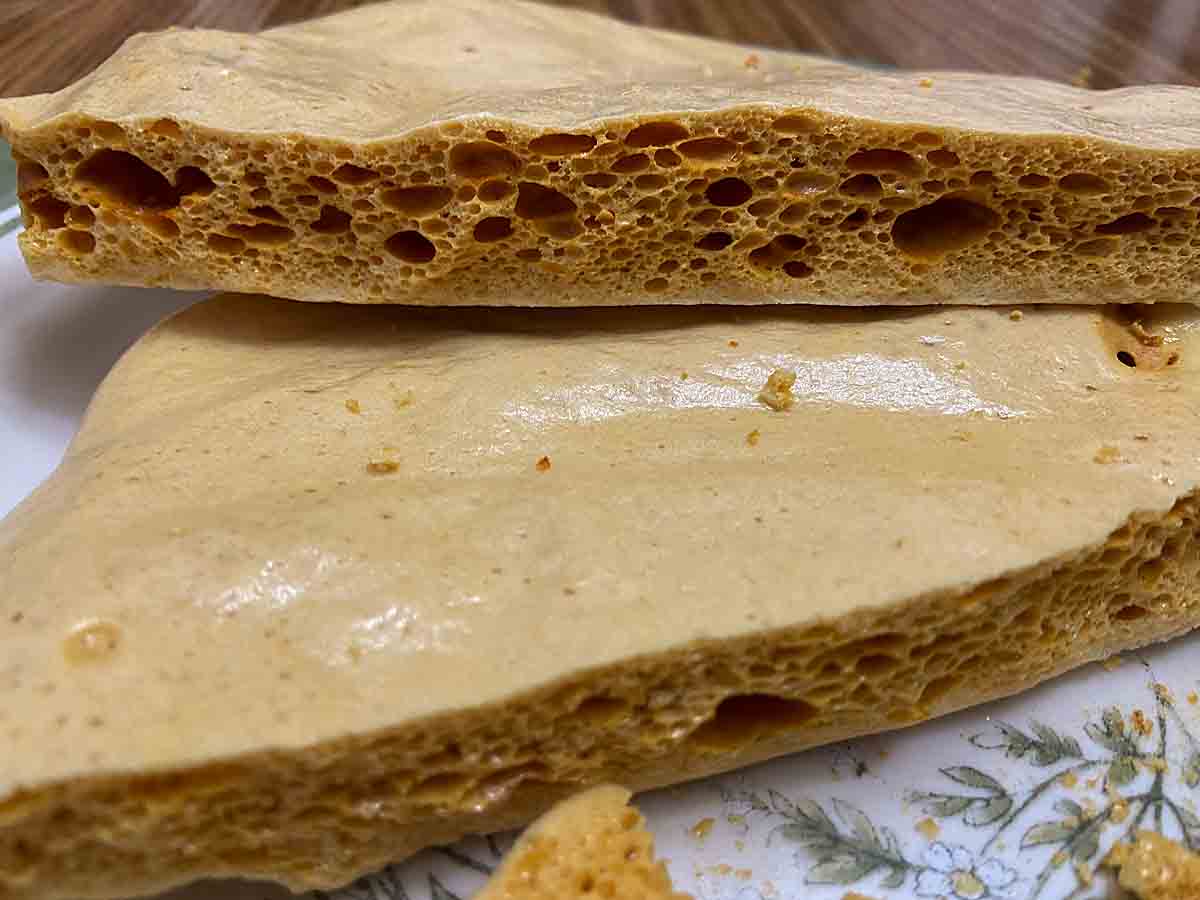
To add vinegar or not. This one I’m truly on the fence on. Adding a Tablespoon of vinegar to the sugar and corn syrup mixture resulted in larger air bubbles and a slightly crisper finish. I initially felt I liked it more. But in the end it was crumblier so I went with the no-vinegar option. The top picture shows the with vinegar version and the bottom without. 
Vanilla. I omitted the vanilla in my final version. It didn’t seem to make much difference in the flavor and I’m hoarding vanilla at the current price.
Real Chocolate versus Candy Melts. There is a lot of chocolate on these so I encourage you to use real chocolate. This can even be chocolate chips if you check the ingredient list to make sure it contains cocoa butter. Just read my melting instructions (in Step by Step) for the easiest way to work with real chocolate!
When I was all done and had dipped the winner in chocolate, I decided that a good chocolate can probably hide a myriad of sins. 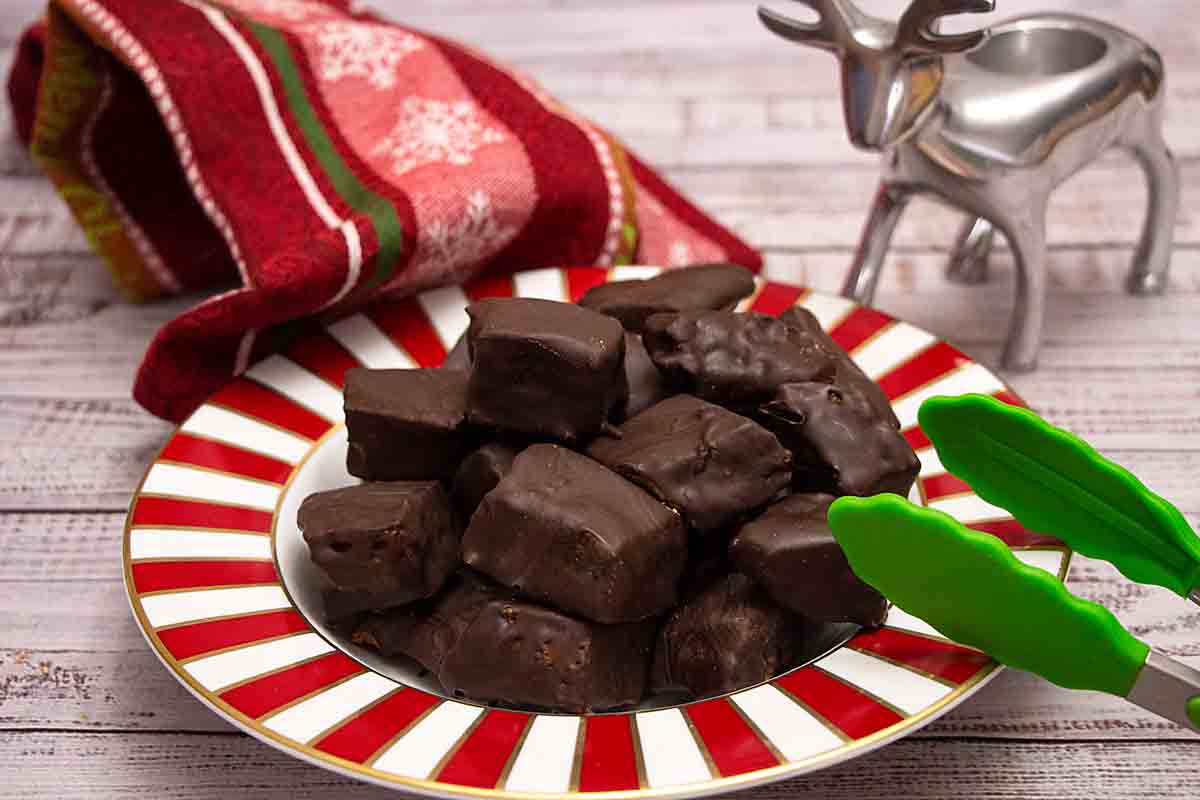
On Corn Syrup and Other Options
Don’t want corn syrup in your life? While for many recipes, there’s an easy work around for corn syrup, in this case I didn’t like the honey or maple syrup options that are often cited. I thought the honey flavor was too strong and tended to take on more of a burnt flavor.
The flavor of the maple syrup was outstanding but the texture of the candy wasn’t good. I might have used too much maple syrup but I wasn’t up to trying another batch. The flavor was so good, though, that it’s probably worth another test–next year!
If you truly can’t have corn syrup–like a friend of mine who’s allergic, I would suggest you try “golden syrup.” This is Britain’s counterpart to corn syrup except it’s made from sugar. You can order it online or even make it yourself.
If you goal is simply to avoid GMOs, you can use organic corn syrup since organic standards don’t allow GMOs. If your avoidance is from a basic health perspective, please realize there is no way to make this healthy (sorry)!
But that’s okay once in awhile! 
Troubleshooting Problems
Sponge candy is considered intermediate in difficulty. If you’ve never made candy before, and have trouble with this, my first suggestion is that you start by making toffee, which is easy and super tasty! Then come back and give this a try again!
The sponge collapses. If you are using the room temperature cooling method, don’t move the pan after pouring in the candy until it is fully cool. Or try the oven cooling technique.
Candy has a burnt flavor. This means your syrup got too hot. The most likely cause is uneven heating of the syrup so it burns, just in spots. This is more likely if you are cooking it at too high a temperature or if your pan size is too large (though it needs to be large enough to accommodate foaming). The next most likely cause is a thermometer that is off and needs to be re-calibrated. In that case, check your manufacturers website for instructions.
Candy is overly sticky or chewy rather than crunchy. This might be due to high humidity–I’ve read that even candy making companies won’t make this on days it rains. Of course winter in Wisconsin is so dry indoors, that I’d make this any time!
Another cause may be that your syrup didn’t reach 295 F (or cooked unevenly). Finally, if the candy was good to start, it may have picked up moisture over time so be sure to store in an airtight container.
Tips and FAQs
Normally you should use a burner size that matches your pan size when cooking. For this, I used a larger burner size which seemed to help the syrup heat more evenly.
Lining the 9 x 13 cooling pan with baking parchment worked like a charm. I didn’t butter the parchment or the pan and the candy released perfectly! Brown parchment is even compostable, I’ve read! 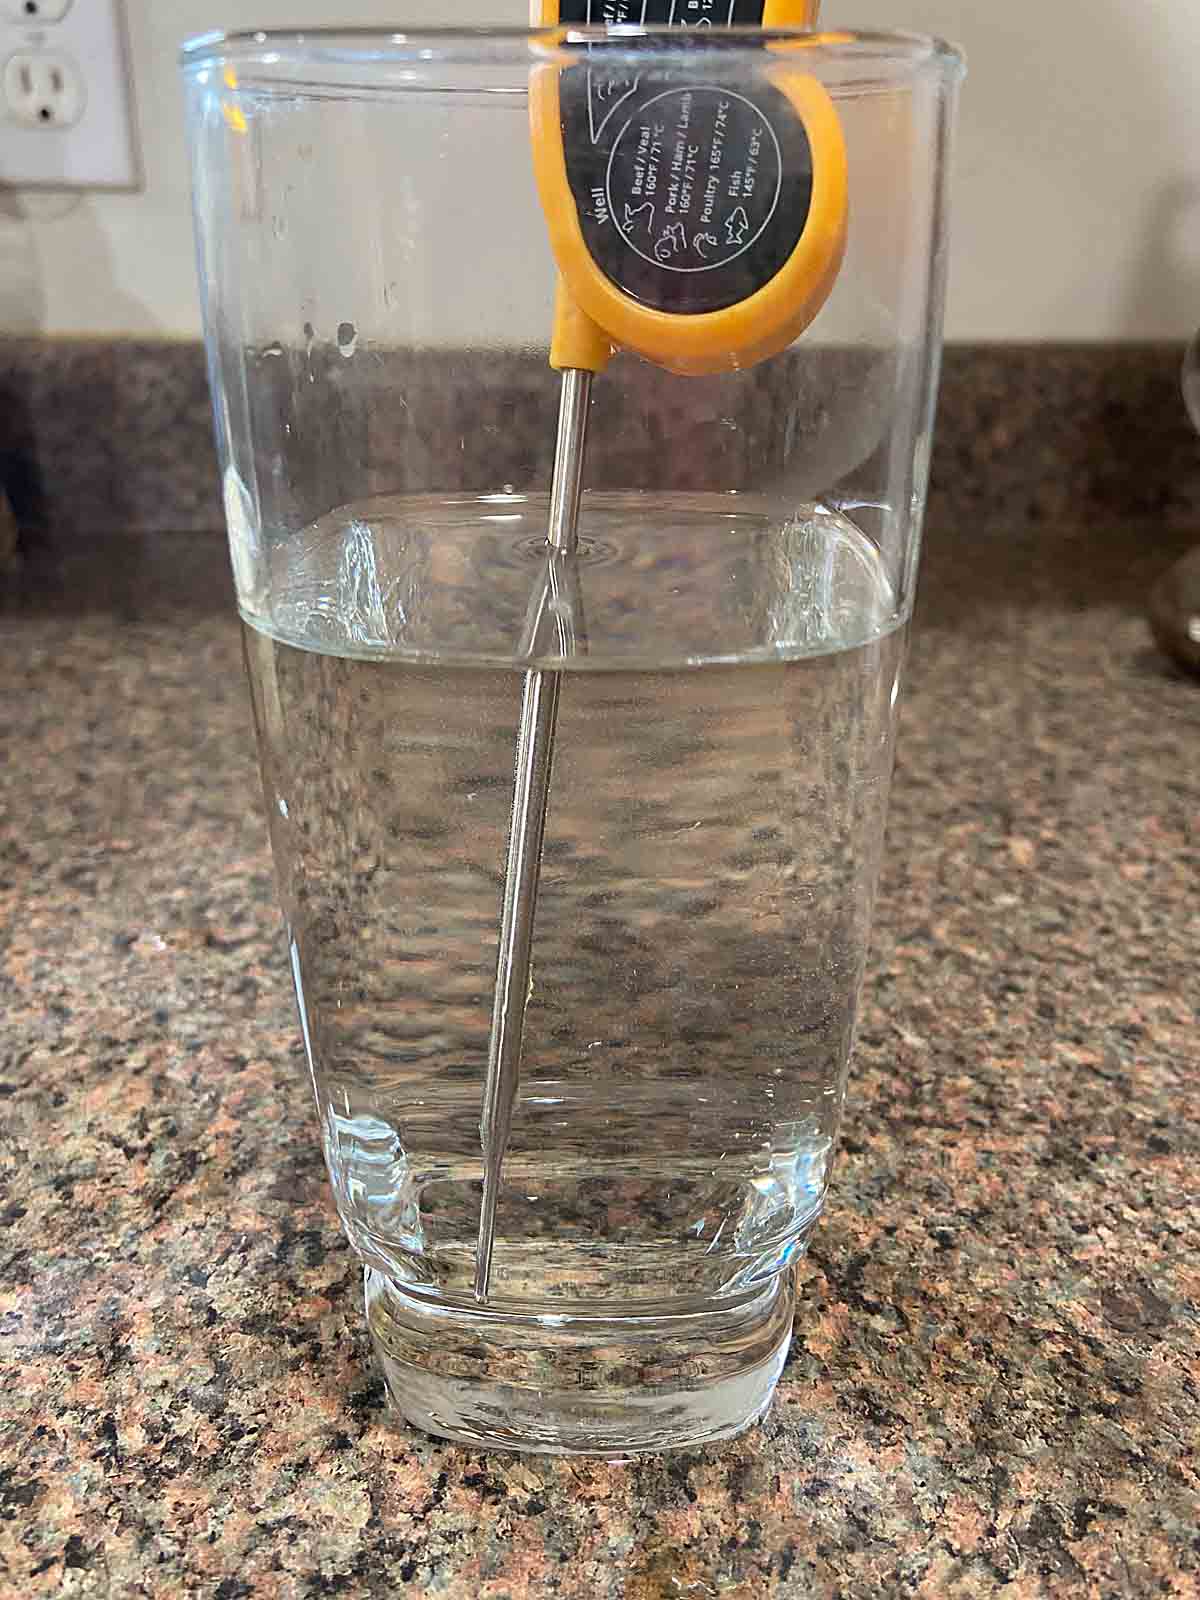
The syrup will look like it’s permanently stuck to your pans and thermometer. Soak in a little warm water and it should dissolve!
And if you’re all psyched now to try some more candy, take a look at the recipes below from my blogging friends! 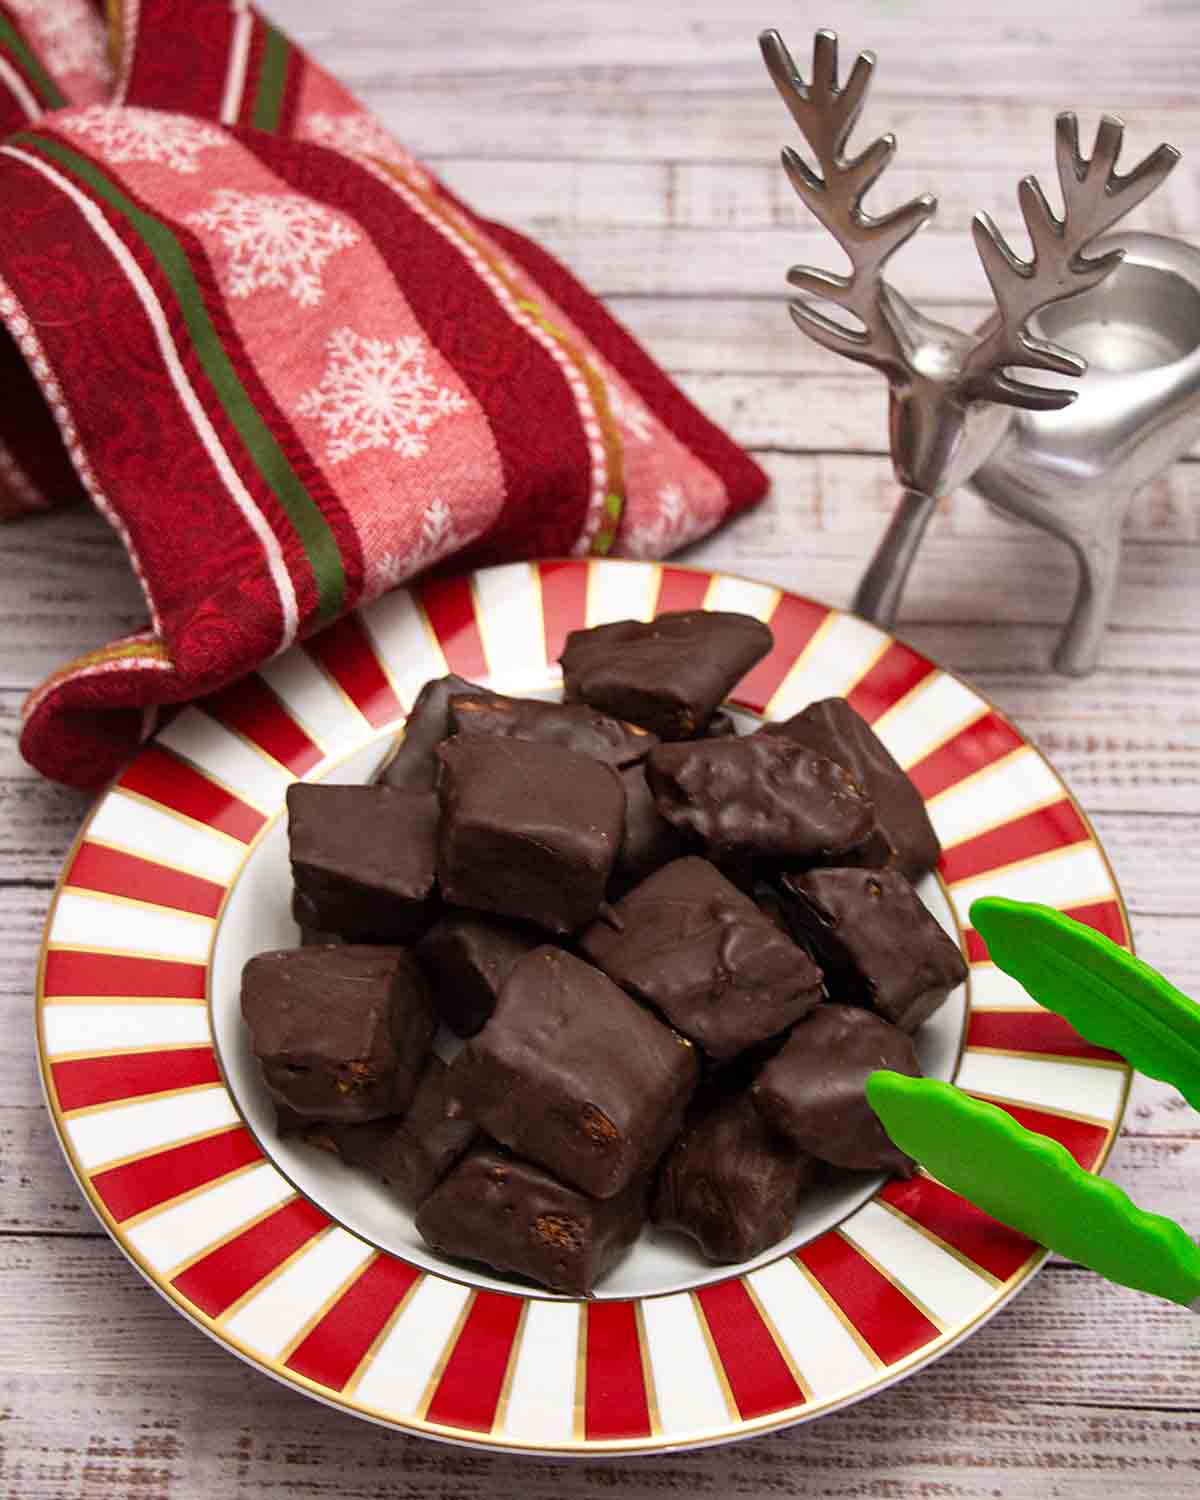
Welcome to #CandyFudgeFavorites Day hosted by Jennifer from Take Two Tapas! It’s the holidays and we are celebrating the holiday tradition of making candy and fudge!
Join me and my fellow bloggers as we share our favorite holiday candy and fudge recipes today. I know you will see some old favorites and I hope you find some new ones!
- Rocky Road Fudge from Jennifer at Take Two Tapas
- Crockpot Peanut Clusters from Jennifer at Leftovers Then Breakfast
- Chocolate Orange Fudge from Michaela at An Affair From The Heart
- Champagne Truffles from Kathleen at The Fresh Cooky
- Candied Bacon from Kathy from Lemon Blossoms
- Slow Cooker Fudge from Ashley at Cheese Curd In Paradise
- 3-Ingredient Chocolate Almond Fudge from Julie at Hostess at Heart
- Rocky Road Clusters from Kathryn at Kathryn’s Kitchen Blog
- Sponge Candy from Inger at Art of Natural Living
- Bourbon Bacon Buckeyes from Terri at Our Good Life
- Honeycomb Candy from Jennifer at Jen Around the World
- Haystacks from Ellen at Family Around the Table
- Peppermint Pretzels from Rebecca at Devour Dinner
- Chocolate Almond Cranberry Clusters from Nicole at Daily Dish Recipes
- Turtle Fudge from Heather at Hezzi-D’s Books and Cooks
- Ube Coconut Truffles from Sue at Palatable Pastime
- Christmas Gum Drop Nougat Candy from Amy at Savory Moments
- Coconut Balls from Sheila at Life Love and Good Food
- Milk Chocolate Fudge from Radha at Magical Ingredients
Homemade Sponge Candy

Ingredients
Sponge Candy:
- 1 cup white sugar
- 1 cup light corn syrup or golden syrup
- 1 Tablespoon baking soda
Dipping Chocolate:
- 4 Tablespoons cocoa butter or coconut oil
- 2 cups real chocolate chips or chopped real chocolate. You can use milk dark or semi-sweet.
Instructions
- Preheat the oven to 225 F if using the oven cool method (recommended).
- Line a 9 x 13 baking pan with parchment paper. Do not use wax paper because it can't handle the high temperature of the candy. Crease the edges slightly to help it sit in the pan. You will be pouring the candy onto the parchment.
- When the syrup cones to a boil, begin checking the temperature periodically with an instant read thermometer. After it has been boiling about 5-10 minutes it will start to turn just slightly yellow which means it is nearing the proper temperature of 295 F. If the syrup is heating very unevenly, swirl the syrup in the pan and lower the heat slightly.
- When the syrup reaches 295 F, stir in the sifted baking soda until just mixed. It may foam up or if already very bubbly, may sink. Immediately pour the mixture into the parchment lined pan disturbing it as little as possible. Don’t worry that it doesn’t fill the pan and don’t level it--you are trying to keep the bubbles intact.
- If cooling at room temperature, leave the pan completely undisturbed.
- If using the oven cool method, put the pan in a 225 F oven then turn off the heat. Let sit for 15 minutes, then remove to finish cooling.
- Preparing the Chocolate and Dipping
- When the candy is completely cool and firm (may take up to a couple hours—I left mine overnight), prepare the chocolate. Chop the chocolate fine and set aside. Then melt the cocoa butter (or substitute) in the microwave. Heat in 30 second bursts, stirring between bursts until melted.
- Add about ¼ cup chopped chocolate to the cocoa butter. Stir until partly melted, then heat again for 10 seconds. Using the instant read thermometer, take the temperature of the chocolate every time you take it out of the microwave.
- Your goal is to keep dark chocolate under 92 F or milk chocolate under 86 F. If the temperature is getting too close to the max, use shorter microwave bursts or stir for longer in between bursts. When chocolate is melted, add another ¼ cup and continue until it’s all melted.
- Drop the candy into the melted chocolate one piece at a time, then roll it and pull it out with a fork.
- Cool on a cooling rack until hardened. If the dipping chocolate cools too much, microwave again for a few seconds and stir, then continue dipping.
After setting an hour after dipping in dark chocolate chips melted with the 4 tablespoons of coconut oil, the chocolate still hasn’t hardened and is still runny. How much longer must I wait?
Are you someplace very warm? Since both coconut oil and chocolate are solid at room temperature this should only be a problem in a hot place. In that case, they would need to go into the refrigerator. Congrats on getting the sponge right though–that’s usually the hard part.
Update: this sponge candy turned out great my 1st try. It has decent sized holes and is airy. My family loves it! I am gonna try different variations to this recipe next time. Fabulous recipe thank you! I used a thermo pro digital thermometer.
Thanks so much for sharing Jess! Isn’t it fun!
I just made this and it looks amazing. I am at 2500 ft so our water boils at 208 degrees calibrated my thermometer and it worked great! The candy is cooling after the oven but it looks like there are going to be big bubbles but don’t know yet I will update. I used your recipe exactly. I did a quick stir with the baking soda on my way to the prepared pan and poured it with plenty of foam can’t wait to see what it does now.
Can you tell me what i did wrong when making sponge candy? It turned out hard as a rock! Does that mean i cooked it too much (I stopped at 300 degrees)
It’s possible the temperature was a problem. It calls for heating to 295 and if your thermometer was off you may even have heated above 300f. But another culprit may be the baking soda addition and handling. Adding the baking soda is what makes it “spongy” so a problem there must also be considered. Was it foamy after adding the baking soda–if not your baking soda may be bad. If it was foamy and then collapsed, you may have handled it too much. Try to jostle it as little as possible after adding the baking soda and don’t level the candy after you pour it into the pan. Then try the oven cooling method in the post which can help preserve the foam.
Since I only make it in Wisconsin in winter, which is dry, I have no personal experience with problems caused by humidity but I know that professional candy companies won’t even make this on humid days. This is a challenging candy to make and even people who make it all the time have trouble sometimes. But I find it a fun challenge so decided to weather a few imperfect batches! Good luck if you decide to try again.
FOR THE 1ST TIME IN 10+ YEARS WE SUCCEEDED AT MAKING SPONGE CANDY, ONLY ISSUE (WHICH ULTIMATELY RUINED IT) WAS THAT WE COULDN’T GET THE WAX PAPER OFF OF THE CANDY, IT STUCK SO BAD WE HAD TO THROW IT ALL OUT. HOW DO WE CORRECT FOR THAT, AND CAN WE USE SILICONE PANS TO PREVENT THE ISSUE?
I’ve always used parchment paper rather than wax paper and i think it’s both stronger and more heat resistant, so more likely to pull off intact. Maybe I’ll have to add a note about this in the post. But to your question, since people make hard candy in silicone molds, I don’t see why this wouldn’t work. Glad the process went well otherwise–you’re so close now!!
Also, should I try dumping the mix at 280 degrees then add the baking soda? Thanks again.. I forgot to ask this in my first email a few minutes ago.. Thanks again.
You know this is one of your more challenging candies to make–even professionals don’t attempt it on humid days, so don’t feel bad if it’s taking awhile to perfect. It sounds like the consistency was correct, so it sounds like you’re very very close. The color of mine is always more golden around the edges and darker in the middle so no worries there.
It’s possible that your thermometer is a bit off. If you do a search on how to test a thermometer you can check out this first. If it’s off the manufacturer may be able to provide instructions to recalibrate it.
You can stir in the baking soda and as soon as it reaches 295 F. In fact waiting may increase the chances of burnt pockets if part of the pan is very hot.
It’s also possible your pan is heating unevenly. Swirling rather than stirring is recommended to help deal with this. I actually bought a new pan with a very thick, very flat bottom and can’t wait to try this year’s batch using that since I’m hoping it will heat very evenly!
Don’t change the order of the steps. If you dump it before you add the soda you won’t get an even mix in and proper consistency. Dropping the temperature you add the baking soda at might help, but I’d only drop by 5 degrees. You’ll know because if it’s too cool, you’ll get candy that is chewy not crunchy.
Feel free to write back with updates and good luck!
I’ve made this twice now. First one tasted slightly burnt. I stirred it constantly. Also, the middle of the loaf was kind of shiny reddish brown in the middle. All ingredients were freshly purchased. Maybe the thermometer? Going to try one more time. Could you tell me how much time should lapse between hitting 295 degrees then adding the baking soda and stirring, then dumping into the 9″ x 13″ pan? Thank you in advance.
Answered above with your other question!
I have been making my sponge candy for years. I put the candy in heated oven at 300degrees for three minutes. It comes out perfect every time.
Interesting. I suppose that’s a variation on the “oven cool” method. Though since that temp wouldn’t really actually cool the 295 F candy, it makes me wonder if there’s more to the stabilization than temperature. I’ll have to try this next year–thanks for commenting.
Mine did not turn out well. I may have made 3 errors.
1. I used half white and half brown sugar
2. I used an instant thermometer instead of candy thermometer but let it go 10 degrees hotter because of the the thermometer and
3. My baking soda was seriously outdated. Any thoughts
How disappointing! WHile it would help to have a description of how it looked in the end to diagnose this, I will go with the potential issues you mentioned. If you used a combo of white and brown sugar to substitute for the white sugar–and still used the corn syrup–that probably isn’t the problem. But if you used brown sugar instead of the corn syrup, that is a potential problem. Corn syrup (as well as the “golden syrup” that the British use) is what is called an invert sugar (actually chemically different) and it performs differently in candies. For some candy recipes it doesn’t matter, but it can, so unless you’re ready for a science project (which can be fun but only if you have the time) don’t use sugar in its place.
An instant read thermometer, if accurate, should be fine, and is what I use now. If your sugar got too hot because your the thermometer was off, it would likely taste burnt. If it didn’t get cooked enough, it might simply be sticky or it might have bigger problems if off by a lot. Did you know that some instant read thermometers can be calibrated at home? You might want to check your manufacturer’s website for instructions (I actually phone a manufacturer’s help line once to get assitance with one of mine).
The baking soda could clearly be the problem. I think there is a fair amount of tolerance in the expiration dates so if it was expired by a month, I’d say this was less likely. But “seriously outdated” sounds like more. If the candy didn’t foam up, that’s a likely culprit.
This is a little bit of an advanced candy recipe. So if you’d like to work up a little more gradually before trying again, you might try my toffee (https://artofnaturalliving.com/homemade-toffee/) which is delicious and a little more resilient. In either case, feel free to write back with more questions and good luck with future candy making!
Being from Buffalo, I always found Sponge Candy to be a crapshoot–sometimes the bubbles/airholes are really tiny and it changes the density and they are too hard for my liking. The larger holes are preferred by me, they “collapse” easily when biting into them–I guess I’d consider them more “tender” and tasted better too. I haven’t been out in a while and remember years ago buying it in the bulk section at Tops Supermarkets, pre-COVID19, in milk, dark, and orange chocolate versions! I assume the vinegar may get me lighter density? I’m not sure where the tipping point is, but I’ve never seen it with holes that large, at least not on commercial sponge candy… maybe I’ll try 2t instead of 1T. Gotta free up the stove first before I can do anything…
Yes, this is a candy you can do a lot of experimenting with! But so worth it! Have fun–and I hear you on getting the stove free!
I am going to attempt to make this for the 1st time ever, but need to dig a little deeper as in the recipe it calls for baking soda and then the instructions it say baking powder….having never made this I am confused. Please help
It’s baking soda–thanks for letting me know; I have it consistent now. Have fun Melody!
Very good article. Both my husband and myself had recipes for our own candy handed down from our parents. We have always called it Angel Food Candy and have been making it for over 30 years. Some years it does not turn out then the next year will be perfect. We attribute it to the weather. Your instructions to sift the baking soda made this years batch one of the best. I drizzle white chocolate over my pieces to give it an extra pretty presentation.
Sounds wonderful Goldie! Thanks for sharing!
Cannot wait to try this. Just purchased two pounds at Watson’s Chocolates in Buffalo. Then had to try a peanut butter sponge candy at Yia Yia’s Chocolates in West Seneca. Excellent! Any recipe ideas on peanut butter sponge candy?
I had not heard of peanut butter sponge candy but it sounds delicious! Hmmm…
Why is there so much oil (4 Tablespoons cocoa butter) in the chocolate? I have coated thousands of caramels and never added oil. I do use organic fairtrade 85-90% dark.
Any comments, anybody?
I think that the chocolate is easier to work with (that is, it is runnier) with added cocoa butter–and even more flavorful. And for 2 cups of chocolate, it’s not that much extra. But if you’ve had success with straight chocolate for your caramels, go ahead and use that here. The dipping will be the same.
Looks similar to honeycomb! Love your detailed instruction! This is a perfect one to gift too!
I have never had homemade sponge candy. I’ve had store bought it’s good….but this has to be amazing…nice & fresh…I gotta make this for sure….wish me luck LOL
I think I used better chocolate than my last store bought, which was a happy surprise! Have fun!
Is this similar to honeycomb? I see this a lot here topping on cakes.
I have never had sponge candy per se, but I think I had the Cadbury version a million years ago. This looks truly amazing. If I feel brave, I might try it!
I have never had homemade sponge candy. Yours look perfect! You sound like a pro after 6 or 7 batches…so many helpful tips!
This is absolutely show stopping! I love the flavor and the texture! I ate all of the first batch so I need to make a double batch next time!
This is such a unique and fun candy!
I’d never heard of this candy before but boy did we enjoy it. I can’t wait to share it with my Christmas guests.
I have never heard the term sponge candy before. We call it honeycomb here which I love making when it works. The oven cooling method is new to me as well.
This is so much fun, I cannot wait to try it — you have so many great tips and tricks! Thank you for sharing, I am an organic corn syrup girl myself and don’t typically like to use much, but sometimes you just need to go for it!
One of my favorite candies but I haven’t made it in forever!
One of my favorite candies but I haven’t made it in forever! Yum!
So many candies, so little time 🙂 !
Sponge candy has been on my to-make list forever now and you did a great job here! Sponge candy is a Buffalo area favorite and people have their favorite places (like Fowlers) to get it. It’s such a delicious candy and bravo!
Amy, we are from Orleans county. My husband went to UB & would stop at Watson’s on ever holiday to get me sponge candy! Our last name happens to be Watson( no relation, darn)
Although I don’t like to fail at making a recipe, I always learn something when I do. So in a weird way I DO like it. Anyway, these look great. Terrific recipe — thanks.