Light and Healthy, White Wheat Slider Rolls
Light, airy and surprisingly easy, White Wheat Slider Rolls are perfect for small sandwiches or even dinner rolls. Healthier doesn’t need to be hard!

Phewww! Our “desperately busy” week is almost over! Did I learn any lessons? Just one. After watching my ham & cheese sliders disappear like water, I need a recipe for slider rolls.
I surfed the web and came up with a great looking recipe from Eggs on Sunday (which the blogger got from the book The Bread Baker’s Apprentice), that I made without changing any ingredients. No changes?? I know… who am I and what have I done with Inger 😉
Ok, I did substitute white (almost) whole wheat flour (organic of course) for the unbleached. My flour is advertised as having all of the nutritive content of the wheat including the germ, but usable like all purpose—does this means it has everything but the bran?? And how would it work? This would be the test!
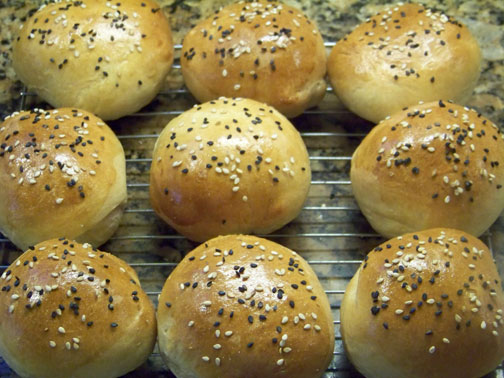
The first rolls were delicious. Light and fluffy, a hint tastier than sometimes bland white rolls, but not wheat-y. They received full approval from the kids, who immediately converted from eating peanut butter on honey whole wheat bread to peanut butter on slider buns. (And yes that does look as strange as it sounds.)
Forming Rolls
Later in the week, I made the recipe again with improved roll-forming techniques. My original buns were too tall (almost globe-like) and a bit irregular in shape. The second time I took some online advice and formed them into rounds by pulling small edges of dough around to the bottom, and pinching them in place. Actually easier than it sounds, though perhaps I should have taken pictures. My second correction was to flatten the rounds slightly to allow for more rise. And I doubled the recipe of course!


Tempted?? Here is the recipe:
White Wheat Slider Rolls

Ingredients
- 4 1/4 cups or a bit more unbleached flour (I used organic white wheat flour)
- 1 1/2 teaspoons salt
- 3 tablespoons sugar
- 2 teaspoons instant yeast
- 1 large egg lightly beaten
- 1/4 cup butter softened
- 1 1/2 cups buttermilk or milk
- 1 egg beaten with 1 t water for eggwash optional
- sesame seeds for the tops optional
Instructions
- Mix together the flour, salt, sugar, and yeast. Add one egg, butter, and buttermilk and mix until all the flour is absorbed and the dough forms a ball. Add extra liquid or flour if needed, until the dough is soft and supple.
- Turn the dough out onto a lightly floured surface. Knead for about 8 minutes, until the dough is soft, supple, and tacky but not sticky. (I did most of this in a free standing mixer, but did some final hand kneading)
- Spray a large bowl with Pam (or oil it by hand) and transfer the dough to the bowl. Cover the bowl with a wet towel and let it rise at room temperature for 1 1/2 to 2 hours, or until doubled in size. (Our house is quite cool, so I finished the rise in the microwave with the light on but I’m guessing the longer rise time is important to the flavor so I left it out for quite awhile first.)
- Remove the risen dough from the bowl, punch it down, and divide it into eighteen 2-ounce pieces (for slider buns) or twelve 3-ounce pieces (for standard buns). (I cut the dough in half, cut each half in thirds, then each of those pieces in thirds. Actually came out pretty even!)
- Shape the pieces of dough into rounds, transfer them to baking sheets lined with parchment paper and flatten slightly (see notes above for forming technique). Let the buns rise at room temperature for 60 to 90 minutes, or until they’re nearly doubled in size.
- Preheat the oven to 400 degrees F. Whisk together 1 egg with 1 teaspoon of water, for an egg wash. Brush the tops of the buns with the egg wash, and sprinkle with sesame seeds if you like. Bake the buns for 12-15 minutes, until the tops are golden brown. Remove them immediately from the pans and cool completely on a wire cooling rack.
These look fabulous! I love that you used White Whole Wheat Flour and they came out good – bookmarking!
When I emailed the flour producer they confirmed that it contains the germ with the bran removed. I was really pleased at how well it worked.
great recipe! i guess it goes to my simple tastes, but my favorite thing is the two colors of seeds on top! 🙂
Thanks. I originally bought the two colors for an entirely different purpose but was really happy to have them for this!
Your slider rolls turned out perfect, and healthy, too!
Thanks–happily enjoying batch #2!
Oh my heavens Inger! You had a busy weekend and managed to bake up these lovely rolls, how??? They look so inviting. I just may need to visit you for some home made sliders, lol… (You know me and yeast:)
Thank you so much for sharing…
P.S. You mentioned you like (to put it mildly) Pinterest, where are you on there???
Here is the link to my “recipes to try” board–really helping my organization! http://pinterest.com/ijwilkerson/recipes-to-try/